
Vocals. By far the most important part in any song, and by extension, any mix.
Bad vocal sound = bad mix. Period. (Exclamation point).
Getting a slamming drum sound may be more difficult, getting massive guitars may be more satisfying, but getting a vocal that the listener can sing along to and relate to IS the endgame. So with that in mind, I thought a start-to-finish tutorial on getting a big rock vocal might be in order.
And what better song to use for an example than one that has hit 4 million plus views on YouTube (and counting!)? And it also happens to be a cover song of one of my favorite bands…double win.
Let’s take a listen to what we’re working with here:
Now it’s pretty obvious that these kids have some serious talent, which of course, makes my job as the mixer infinitely easier. And what is even more impressive is that their age range is from 2 to 16. At 16, I was still working on pentatonic scales in my basement. Pretty great what these kids have done…but don’t take my word for it, Tool’s guitarist Adam Jones gave them his stamp of approval:

Even Metal Injection and Guitarworld gave these kids some love. And of course, well deserved! But the crown jewel of this performance is the massive pipes on singer Kala Rose.
So let’s use her vocal here and go step by step from completely dry to (hopefully!) big and bombastic.
EQ
Unless something is wrong with the original vocal sound, I tend to approach vocal EQ pretty carefully. It’s pretty rare that I manhandle the EQ…and when I do have to have to be heavy-handed, it usually means the engineer really butchered the recording.
Lucky for me, the guy handling the recording duties for the OMF is solid at what he does as Kala’s vocals needed very little except some top end “cutting” EQ to help it poke out of a dense rock mix.

A +3db shelf at 8k and up for brightness and a wide +3db bump at around 6k for “cut”. Nothing special here. I typically find that most well recorded vocals are the same. If you find yourself with poorly recorded vocals, you may have to really get in there to save the vocal sound though. Be prepared to wage war if it’s necessary!
Now after the vocal brightening and with how hard I’m compressing, I typically run the vocals through a de-esser for good measure. Nothing kills a good vocal sound as quickly as the ear-piercing “psssss” sounds.
I know a lot of mixers really dig specialized de-essers and prefer the latest and greatest…but I’ve never had a problem with the set-it-and-forget-it style of the ProTools stock de-esser.
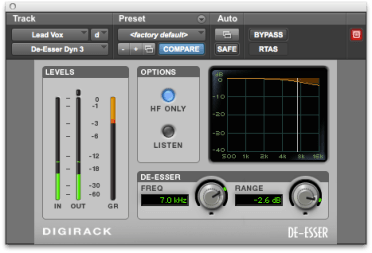
Nothing too flashy here. I make sure that only the high-frequencies are taking the hit and I’m killing off about 3-4db at the most on the sibilant syllables (sitting silently sipping sangria surreptitiously).
Same thing with the EQ settings…90% of the time on well recorded vocals, you don’t have to make any major moves with your de-esser. But if you need to, do not be afraid to crank it!
Compression
Now I may insult your sense of decency and good taste in this section. You may recoil in shock and horror at some of the numbers offered here…for I do indeed love crushing the holy Zeus-praising McSnuggle Monster out of a rock vocal. And with Kala’s vocal in this song, I saw no reason to do anything different.
But what I don’t do is make one compressor do all the work. For the track here, I’m hitting the SSL Channel Strip compressor first and then dumping that into the CLA 1176 compressor. Both of these are after the EQ. I’ve found that placing the compressors after the EQ allows me to blast the high end and then let the compressors take care of smoothing it out. That’s what they’re there for! To my ears, this is much more forgiving to broad EQ sweeps than placing the EQ post compression.
You’ll see in the video below that I’m cutting about 6db with a quick attack, quick release, and a ratio of about 2.5:1 on the first compressor. Then with a medium attack and a fast release, I hit the ever-wonderful “all” ratio button and shave off another 10db on the peaks with the 1176. I’ve found that plugins have to be treated a bit more delicately, but the original 1176 hardware can be slammed even harder with glorious, glorious results. If you happen to have one, give it a go.
Distortion
With more aggressive rock vocals, I usually will distort them at least a little bit; just enough to add a bit of bite and aggression. It doesn’t have to be a lot to be effective. On Kala’s main vocal track, I only used a touch of the PSP MicroWarmer with their “Track Tape Normal” preset. Take a look at the before and after:
Very subtle. But don’t worry, we’ll be adding a shit-ton more when we get to the parallel track. I want to keep the main vocal track as sort of the “base” or the foundation for the vocal.
Effects upon Effects
Alright, strap in because there is a whole lot happening here. What I usually do is use quite a lot of effects, but use each individual effect rather sparingly. This mix was no different…let’s dive in.
The first thing I’m using is a very subtle spreading effect…check out this trick in detail. All I’m doing is sending the vocal to a plugin that pitches one side slight up while pitching the other side slightly down. I’m not hitting this hard at all, just enough to add a bit of width to the vocal.
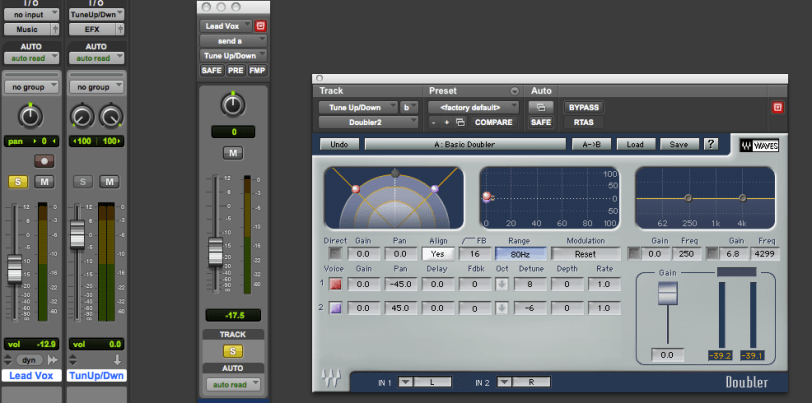
Vocal Spreader
From there, I’m sending the vocal to some reverb. I’m not a big fan of drowning the vocals (or anything really) in reverb, so Kala’s voice is only getting a touch of it here.
BUT…the glorious trick about getting a wide ‘verb sound is this: make sure the settings for your reverb are slightly different in the left and right channels. It’s instant stereo spread and one hell of an easy way to add width to anything. Check it out:
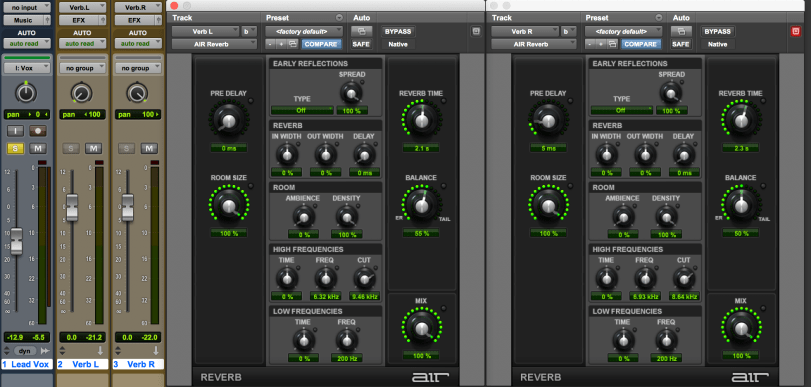
Vocal Reverb
Next is a short delay to add a bit of depth to the voice. Again, this is subtle…but effective. And I’m using the same multi-mono trick here where the left and right channels have slightly different settings on the delay return in order to maximize the width.
Remember kids, width in a mix comes from the left and right channels being different from each other.
I’m using my all-time favorite delay plugin, the Massey TD-5, which adds a bit of harmonic distortion for some “grit” as well.
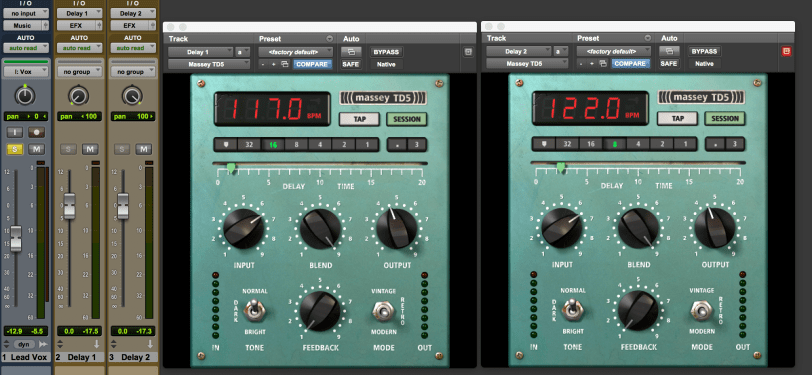
Short spreading vocal delay
After the short delay, I send the vocal track to a bit longer delay for that nice “tail” and even more depth. But, as always, I’m messing with the delay sound a bit to keep it interesting.
So here the vocal hits the stock ProTools multi-delay plugin (who says stock plugins sound bad?!). From there, the delayed sound hits the URS Saturation plugin for a little harmonic distortion (I’d suggest going with another plugin though…the newest version of this plugin is buggy as hell and URS seems to be a company in decline). The signal then goes to an SSL EQ that is pretty similar to a telephone type of EQ effect. Kill all the lows, all the highs, and accentuate the mid range. This gets this delay cutting through without being obtrusive. And interesting is good, right?
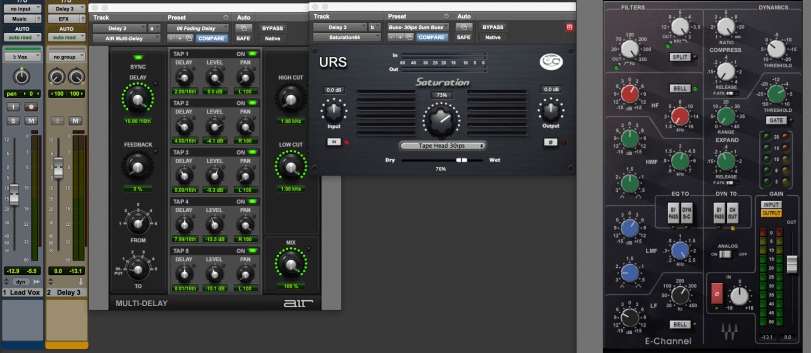
Longer Delay
The best thing about this track is that I’m actually taking an Aux send on the delay channel and feeding it back into itself. So it creates a loop where the vocal delay sound gets a bit more distorted and mid-rangey with every pass. Below you can see the “Delay 3” send going right back into the “Delay 3” channel.

So we’ve got a short delay and a longer delay…now enters the longer-er delay. This has a longer feedback on it and really adds a ton to the depth and the “length” of the vocal sound. And of course I’m adding a bit of grit with the TD-5 and messing with the EQ on the SSL Channel to…well…to keep it interesting of course! Though not pictured, again the right channel has a slightly different bpm setting than the left to add width to the sound.
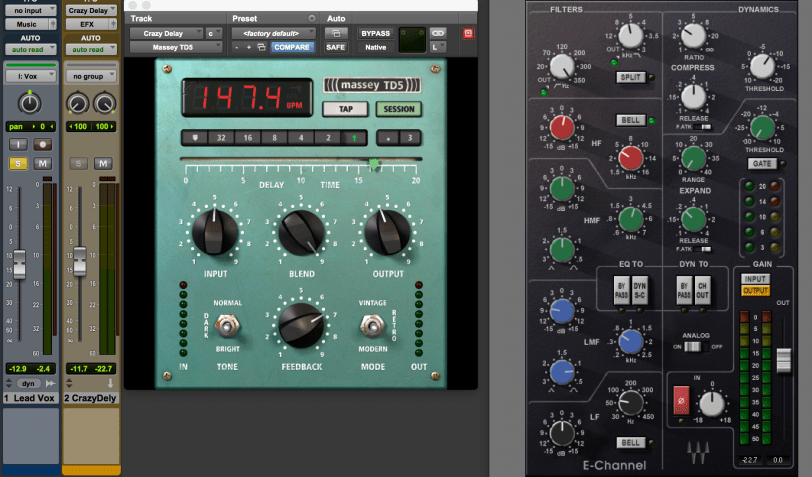
Even Longer Delay
Now we have all these Aux returns with the doubling spreader, reverb, and various delays…let’s give them all a bit of “glue”.
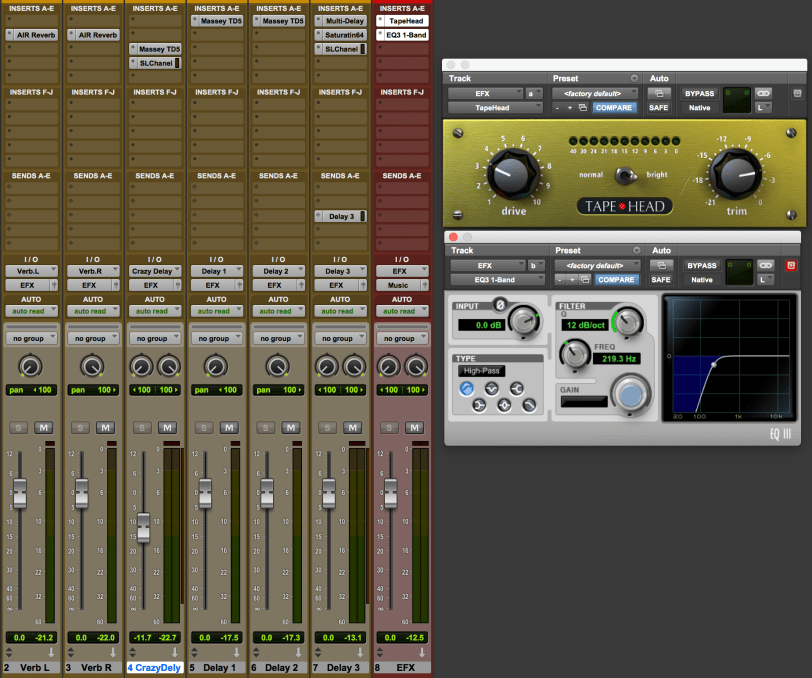
All effects return get routed to one “EFX” bus
Every effect return gets dumped into the “EFX” channel. Here, everything gets a touch of the Massey TapeHead distortion and then a high-pass filter at around 200hz to keep these effects from getting too muddy.
And there ya go.
A ton of effects, but only a little bit of each one. We’re not looking to drown out the vocal, we’re looking to make it shine!
A little before and after action for ya:
Parallel Chain
I am a HUGE fan of getting a parallel vocal (drum, bass, guitar…) chain up and going and then just destroying it. Then, like the sneaky fox I am, I’ll sneak that back underneath the original sound to thicken up the original track. It’s incredibly effective and really not all that hard. Win-win in my book.
I really wanted this vocal to be aggressive and distortion with compression is the way to get there. But if you make it too obvious, it starts to sound way-too-over-the-top…way-too-quick. If you use a parallel chain, you can tuck the far-too-distorted and far-too-compressed vocal back in under your clean (well…clean-ish) vocal and get the aggression without the downside.
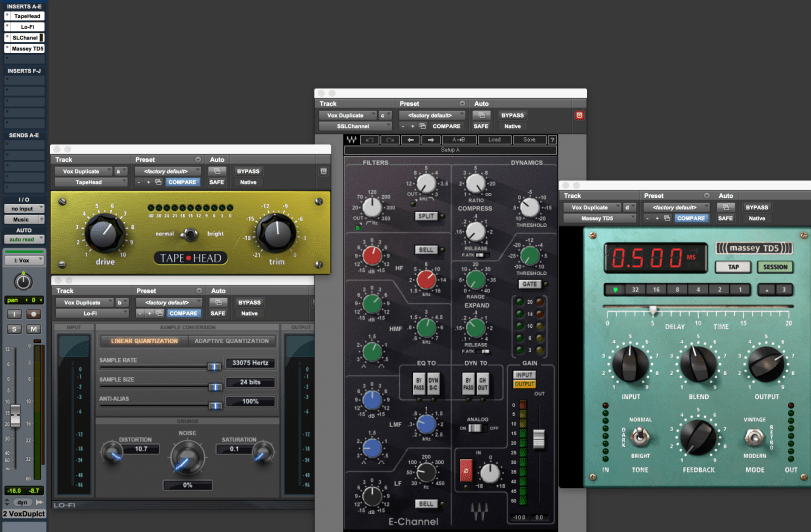
So this is an exact duplicate of the main vocal track. Except the duplicate is getting hit hard with TapeHead and then hit even harder with Lo-Fi. From there, some minor EQ treatment straight into a short delay for depth. No feedback or trailing delays here, just a one and done.
Before and after:
Now even I will (grudgingly) admit that the distortion seems a bit over the top when solo’d. But the joy of mixing is that we’re not listening to the vocals solo’d. A lot of that distortion blends in once the band is jamming behind it. Snip, snap, dippity-doop.
Vocal Chain Order
There are a lot of different schools of thought when it comes to the order of your plugins for vocals. But here is my tried and tested approach that is in no way rigid or formulaic…your mileage may vary:
*Hit it with some light distortion first. Do this before compression so as the vocal gets louder, the distortion increases.
*EQ before compressing as well. This gives you a ton more flexibility to really make some more drastic EQ moves and then let the compression smooth it all out. It makes EQ’ing far less touchy and honestly a bit more fun.
*From there, squash the ever-loving-shizdizzle out of the vocal. Feel free to spread this out over more than one compressor. I typically will shave off 3-6db on the peaks with the SSL channel strip compressor before crushing it with the 1176.
*After all of that, throw on the de-esser. That way, any “sssss’s” that the compression amplifies will get taken care of.
Final Thoughts
So there it is. Top to bottom breakdown of a kickass rock vocal sound. I want to emphasize that there are about a thousand different ways to get to a great vocal. But I’ve been doing some variation of the above and usually am not let down.
Of course, still be creative and keep it flexible. If something isn’t working for your mix, freaking change it, man! Or just add more distortion. Oh man, do I love distortion.
Massive thanks to Aaron at the O’Keefe Music Foundation, Kala Rose, and the rest of the brilliant young musicians at OMF. Keep on creating, guys!
 Jeffro is a recovering gear-aholic who spends somewhere between 2 and 300 hours per week mixing music. Going strong in the studio world since 1999, he loves long walks on the beach, baskets full of puppies, and writing in the 3rd person.